Last night, Don was away at supper, so Quinn and I just had pierogies (and I had a salad). Unfortunately, they were the frozen kind. If you've ever had proper, fresh made pierogies, you know that the frozen ones just don't live up to those, but they are fast and easy to make.
So...no photos today. It was a pretty boring and unimaginative (but practical) meal.
One of my friends asked about my photographs. She wanted to know if I staged them. Usually, no, I don't (though I have brought one dish down to my light box to shoot it, but I didn't do anything fancy to it). Seriously...by the time the food is ready to be eaten, I'm hungry and want to eat. Truth be told, I usually photograph Don's plate because mine usually looks like a pile of slop, but I don't make any special adjustments to it just to photograph it.
I usually have to be quick, because Don is generally standing there, just off camera, asking "Are you finished yet?"
At least I know he likes my cooking!
Wednesday, September 8, 2010


Tuesday, September 7, 2010
What to make when you have chicken that HAS TO BE cooked?
So, I took some chicken out of the freezer the other day with the intention of making a stir fry. I have some bottled schezwan sauce that I was planning on tweaking a bit, and some frozen "stir fry" veggies. Nice, quick, easy...except I really wasn't in the mood for eating stir fry.
That's one of the down sides of planning your meals ahead. Everything sounds so delicious when you make your list, but by the time you need to start cooking it, you might not want it.
I HAD to cook this chicken. What was I going to make?
I opened the fridge, stared in there blankly for a while, then closed the door. Opened the cupboards, stared in there blankly for a while, then closed the door. Got distracted by Iron Man Armored Adventures with Quinn, then realized that we needed to eat and I needed to stop procrastinating...and then it hit me.
I had an idea!
Checking the fridge again, I had eggs, mozzarella, parmesan, lettuce, caesar dressing, focaccia, and the chicken. In the cupboard I had jarred pasta sauce, spaghetti, and bread crumbs.
This was a no brainer...I can't believe I didn't think of it sooner!
Chicken Parmasan!
I don't have measurements here...because it's not really a recipe that you need to follow to the letter. Remember, a few posts ago when I said that you just need to know what tastes good and then put those flavours together? If you've ever had chicken parm in a restaurant, you already know how it works...you just need to have a little faith in yourself and give it a go!
You can do it (Tom *cough*)!
So here's what I did...the timing is pretty easy on this meal as well.
- Preheat the oven to 350 degrees.
- Rinse and pat dry chicken breasts (I cooked up 3 small ones, boneless, skinless).
- In shallow bowl, beat one egg.
- In second shallow bowl (or plate), put some bread crumbs (I'd say about 1/3 cup?), pepper, a titch of salt, and a handful of parmesan cheese (either freshly grated, by you, or that stuff you buy in the fancy pants cheese section already grated for you...not the Kraft stuff), and some italian herbs, dried, whatever...I used some chopped fresh basil from the garden. Alternately, you can also buy some "Italian seasoned bread crumbs" and not have to fuss about it.
- Get a baking sheet, line with foil (because I'm lazy and hate washing baking sheets). I also use a baking rack so that the chicken gets crispy on the bottom too, but that's not imperative. It's not the end of the world if you don't have one.
- Dip a chicken breast in the egg, and then the breadcrumbs to coat. Place on baking sheet (or rack) and repeat.
- Pop chicken into preheated oven for about 20 to 30 minutes, depending on how big they are. I use two methods to check doneness...a digital thermometer should read 165F to kill all the pathogens (plus, it will continue to cook a bit after you remove it, AND you'll be putting it back in to melt the cheese anyway), or I actually cut it open and look. For this recipe, you're going to be covering it up anyway. Who cares if there's a cut in it?
Ok, so you have about 20 minutes to kill at this point. Why not make some homemade croutons?
I have some "Tuscan Herb Focaccia" for some portobello burgers later this week. I cut one up into cubes, tossed in some olive oil, placed in another (foil lined) baking dish, and toasted in the oven. Keep an eye on them so they don't burn, but you're looking at about 10 minutes. Pull them out and let them cool.
Pasta cooking time (you still with me, Tom?)
- Put a pot of water on to boil.
As far as timing goes, the chicken should be nearly done when the water boils. This is where you need to be a multitasker, but it's nothing you can't handle (Tom).
Get all your stuff together in these last moments: jar of tomato sauce (I used PC Fire Roasted Tomato Sauce because it's what we had), slice some mozzarella (maybe 1/4" thick?), pasta (we love the Healthy Harvest spaghetti), mixed greens, parmesan cheese, caesar dressing, and croutons.
Ok, you ready?
- Put pasta in boiling, salted water and turn down a bit so you don't have boil over. Stir this pasta occasionally so it doesn't stick.
- Pull chicken out of the oven. Spoon a couple of tablespoons of sauce (yup, right out of the jar!) onto chicken breasts and top with sliced mozzarella. Sprinkle on a bit more parmesan cheese, and place back in oven to melt.
- Start your salad. Place a couple of tablespoons of ceasar dressing (we use the type you find in the produce section...it's super tasty!) in the bottom of a bowl, toss in your mixed greens, and mix to coat with dressing. Serve in bowls, toss in a few croutons, and top with a bit of parmesan cheese (I love using a veggie peeler to slice cheese ribbons on top...looks all "fancy pants")
Salad is done.
- Check your chicken...cheese should be melted by now. If you like a little browning on top, hit up the broiler and KEEP AN EYE ON IT! I like it just melty, and I'm a total spaz, so I avoid the broiler thing as much as possible (or most of what I make would be burnt).
Chicken is done.
- Check your pasta. Should be al dente (we should all know what that means by now, but if you like your noodles smushy, cook it until you like it). Drain pasta in a colander. While it's doing its thing in the sink, pour some of that jarred sauce into the bottom of the hot (now dry) pasta pot, give the colander a shake to get rid of any extra water, and plop the pasta into the warming sauce. Toss it around to coat with sauce, and you're ready to plate!
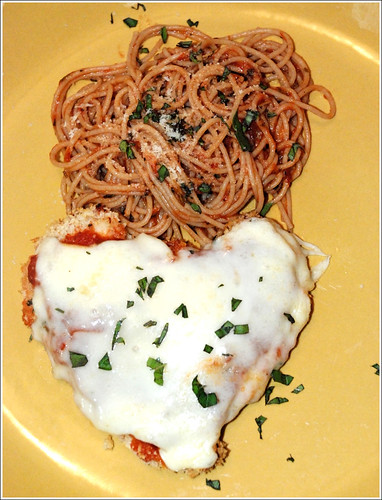
Pasta on the plate, chicken beside it, a little more shredded parmesan (Death by Parm?), pepper, fresh chopped basil if you have it, et voila! You've made a really fancy fricken dinner, using what you probably have in your cupboards, and it was pretty easy, no?
Enjoy, and revel in the compliments.
That's one of the down sides of planning your meals ahead. Everything sounds so delicious when you make your list, but by the time you need to start cooking it, you might not want it.
I HAD to cook this chicken. What was I going to make?
I opened the fridge, stared in there blankly for a while, then closed the door. Opened the cupboards, stared in there blankly for a while, then closed the door. Got distracted by Iron Man Armored Adventures with Quinn, then realized that we needed to eat and I needed to stop procrastinating...and then it hit me.
I had an idea!
Checking the fridge again, I had eggs, mozzarella, parmesan, lettuce, caesar dressing, focaccia, and the chicken. In the cupboard I had jarred pasta sauce, spaghetti, and bread crumbs.
This was a no brainer...I can't believe I didn't think of it sooner!
Chicken Parmasan!
I don't have measurements here...because it's not really a recipe that you need to follow to the letter. Remember, a few posts ago when I said that you just need to know what tastes good and then put those flavours together? If you've ever had chicken parm in a restaurant, you already know how it works...you just need to have a little faith in yourself and give it a go!
You can do it (Tom *cough*)!
So here's what I did...the timing is pretty easy on this meal as well.
- Preheat the oven to 350 degrees.
- Rinse and pat dry chicken breasts (I cooked up 3 small ones, boneless, skinless).
- In shallow bowl, beat one egg.
- In second shallow bowl (or plate), put some bread crumbs (I'd say about 1/3 cup?), pepper, a titch of salt, and a handful of parmesan cheese (either freshly grated, by you, or that stuff you buy in the fancy pants cheese section already grated for you...not the Kraft stuff), and some italian herbs, dried, whatever...I used some chopped fresh basil from the garden. Alternately, you can also buy some "Italian seasoned bread crumbs" and not have to fuss about it.
- Get a baking sheet, line with foil (because I'm lazy and hate washing baking sheets). I also use a baking rack so that the chicken gets crispy on the bottom too, but that's not imperative. It's not the end of the world if you don't have one.
- Dip a chicken breast in the egg, and then the breadcrumbs to coat. Place on baking sheet (or rack) and repeat.
- Pop chicken into preheated oven for about 20 to 30 minutes, depending on how big they are. I use two methods to check doneness...a digital thermometer should read 165F to kill all the pathogens (plus, it will continue to cook a bit after you remove it, AND you'll be putting it back in to melt the cheese anyway), or I actually cut it open and look. For this recipe, you're going to be covering it up anyway. Who cares if there's a cut in it?
Ok, so you have about 20 minutes to kill at this point. Why not make some homemade croutons?
I have some "Tuscan Herb Focaccia" for some portobello burgers later this week. I cut one up into cubes, tossed in some olive oil, placed in another (foil lined) baking dish, and toasted in the oven. Keep an eye on them so they don't burn, but you're looking at about 10 minutes. Pull them out and let them cool.
Pasta cooking time (you still with me, Tom?)
- Put a pot of water on to boil.
As far as timing goes, the chicken should be nearly done when the water boils. This is where you need to be a multitasker, but it's nothing you can't handle (Tom).
Get all your stuff together in these last moments: jar of tomato sauce (I used PC Fire Roasted Tomato Sauce because it's what we had), slice some mozzarella (maybe 1/4" thick?), pasta (we love the Healthy Harvest spaghetti), mixed greens, parmesan cheese, caesar dressing, and croutons.
Ok, you ready?
- Put pasta in boiling, salted water and turn down a bit so you don't have boil over. Stir this pasta occasionally so it doesn't stick.
- Pull chicken out of the oven. Spoon a couple of tablespoons of sauce (yup, right out of the jar!) onto chicken breasts and top with sliced mozzarella. Sprinkle on a bit more parmesan cheese, and place back in oven to melt.
- Start your salad. Place a couple of tablespoons of ceasar dressing (we use the type you find in the produce section...it's super tasty!) in the bottom of a bowl, toss in your mixed greens, and mix to coat with dressing. Serve in bowls, toss in a few croutons, and top with a bit of parmesan cheese (I love using a veggie peeler to slice cheese ribbons on top...looks all "fancy pants")
Salad is done.
- Check your chicken...cheese should be melted by now. If you like a little browning on top, hit up the broiler and KEEP AN EYE ON IT! I like it just melty, and I'm a total spaz, so I avoid the broiler thing as much as possible (or most of what I make would be burnt).
Chicken is done.
- Check your pasta. Should be al dente (we should all know what that means by now, but if you like your noodles smushy, cook it until you like it). Drain pasta in a colander. While it's doing its thing in the sink, pour some of that jarred sauce into the bottom of the hot (now dry) pasta pot, give the colander a shake to get rid of any extra water, and plop the pasta into the warming sauce. Toss it around to coat with sauce, and you're ready to plate!
Pasta on the plate, chicken beside it, a little more shredded parmesan (Death by Parm?), pepper, fresh chopped basil if you have it, et voila! You've made a really fancy fricken dinner, using what you probably have in your cupboards, and it was pretty easy, no?
Enjoy, and revel in the compliments.
Friday, September 3, 2010
This is the post where I admit my food sucked
Last night I tried a new recipe...it was a really nice macaroni and cheese with spinach and proscuitto. The mozzarella on top was all melty and brown, the sauce was nice and creamy...mmmmm.
Holy crap, was it salty! Don says that other than the saltiness, it was tasty. I was too disappointed to agree.
I made a point to undersalt the sauce, knowing there was parmesan in there and there was going to be proscuitto added to it before it baked. What I forgot about was the pasta.
See, I salt my water (as one should unless they have dietary restrictions) "like the sea". The recipe calls for draining the pasta but for 1 cup of pasta water. The starch in the water would help bind with the thick sauce, and make it perfect and creamy and help it cling to the pasta.
No problem, except I didn't factor in the salt levels in the pasta water and that resulted in a nearly inedible meal.
Sucks, that. But you know, the recipe itself has potential. I'll try it again in a while and make a few adjustments.
Holy crap, was it salty! Don says that other than the saltiness, it was tasty. I was too disappointed to agree.
I made a point to undersalt the sauce, knowing there was parmesan in there and there was going to be proscuitto added to it before it baked. What I forgot about was the pasta.
See, I salt my water (as one should unless they have dietary restrictions) "like the sea". The recipe calls for draining the pasta but for 1 cup of pasta water. The starch in the water would help bind with the thick sauce, and make it perfect and creamy and help it cling to the pasta.
No problem, except I didn't factor in the salt levels in the pasta water and that resulted in a nearly inedible meal.
Sucks, that. But you know, the recipe itself has potential. I'll try it again in a while and make a few adjustments.
Wednesday, September 1, 2010
Curry Cream Tortellini
Not sure where I got this one from, but it was jotted down in my recipe file. It turned out pretty good (of course, I made some adjustments) but I would consider thickening the sauce a bit before serving. Maybe with a cornstarch slurry.
Although, it made a really tasty soup like dish! I served it with a side salad of mixed baby greens and a garlic papadum that I toasted up in the microwave.
Curry Cream Tortellini

1 shallot, finely chopped
1 jalapeno, seeded and finely chopped (you can omit this if you're spice sensitive)
2 teaspoons curry powder
1 clove garlic
2 tablespoons olive oil
1 1/2 cup vegetable stock
1 14 oz can coconut milk
1 package tortellini (we used cheese, mushroom would be wicked good!)
4 large basil leaves, chopped
1 tablespoon honey
1 tablespoon fresh ginger
Chopped peanuts (optional)
Heat oil in saucepan and soften the chopped shallot and jalepeno (for a minute or two). Grate in garlic and add curry powder. Heat until the curry powder warms (you'll smell it!)
Add veggie broth carefully (curry facial anyone?) and bring up to a boil. Turn down to a simmer and let it do its thing for about 5 minutes, stirring a couple of times.
While that's going on, toast your chopped peanuts by placing them in a dry frying pan over the heat, shaking often, until you smell them, then remove from heat. Keep a close eye on them though, because one second it may look like they are golden brown, and the next second they will be charred and leave a horrific smell in your house that won't go away for hours. Don't say I didn't warn you.
Back to the saucepan: Pour in coconut milk, tortellini, honey and grate in ginger (I keep mine in the freezer...grates like a breeze and lasts a lot longer than leaving it out). Bring up to a simmer (DON'T BOIL) and stir until pasta is nearly done. Sprinkle in basil at the last minute, let pasta finish cooking, and serve with toasted peanuts on top if you like.
I had some store bought papadums in the cupboard so I oiled them lightly and tossed one at a time into the microwave for about 40 seconds. Burnt papadum is another one of "those smells that never go away" so keep an eye on them.
Although, it made a really tasty soup like dish! I served it with a side salad of mixed baby greens and a garlic papadum that I toasted up in the microwave.
Curry Cream Tortellini
1 shallot, finely chopped
1 jalapeno, seeded and finely chopped (you can omit this if you're spice sensitive)
2 teaspoons curry powder
1 clove garlic
2 tablespoons olive oil
1 1/2 cup vegetable stock
1 14 oz can coconut milk
1 package tortellini (we used cheese, mushroom would be wicked good!)
4 large basil leaves, chopped
1 tablespoon honey
1 tablespoon fresh ginger
Chopped peanuts (optional)
Heat oil in saucepan and soften the chopped shallot and jalepeno (for a minute or two). Grate in garlic and add curry powder. Heat until the curry powder warms (you'll smell it!)
Add veggie broth carefully (curry facial anyone?) and bring up to a boil. Turn down to a simmer and let it do its thing for about 5 minutes, stirring a couple of times.
While that's going on, toast your chopped peanuts by placing them in a dry frying pan over the heat, shaking often, until you smell them, then remove from heat. Keep a close eye on them though, because one second it may look like they are golden brown, and the next second they will be charred and leave a horrific smell in your house that won't go away for hours. Don't say I didn't warn you.
Back to the saucepan: Pour in coconut milk, tortellini, honey and grate in ginger (I keep mine in the freezer...grates like a breeze and lasts a lot longer than leaving it out). Bring up to a simmer (DON'T BOIL) and stir until pasta is nearly done. Sprinkle in basil at the last minute, let pasta finish cooking, and serve with toasted peanuts on top if you like.
I had some store bought papadums in the cupboard so I oiled them lightly and tossed one at a time into the microwave for about 40 seconds. Burnt papadum is another one of "those smells that never go away" so keep an eye on them.
Tuesday, August 31, 2010
Fishcakes and Skullheads
When we were kids, we ate Brussels sprouts a lot. My Grandma Val (I believe) told us once that they were "skullheads", and that did the trick! We ate them right up.
My "skullheads" recipe is pretty simple, and may not sound appetizing, but I assure you, they are. I pick Brussels sprouts all about the same size (smaller is tastier, as is true for a lot of veggies) but as long as they aren't the size of my hand, they are fine. A little rinse, a cut in half, and a toss into a non-stick frying pan. If there are loose leaves that fall in, don't fuss, they are actually the best part of this dish. I admit that I often peel the leaves off on purpose just so I can have more of them.
Add about 1/4 cup water and a sprinkle of salt to the pan and let the veggies steam a bit. Turn down the heat to medium-high and add a tablespoon or so of butter. Allow to melt in, shake it up occasionally, and just let it sit and caramelize.
I usually add a couple of tablespoons of butter in 2 installments, but cook until the sprouts look brown and the loose leaves almost look burnt. Not quite black, and not stinking up the house with char, but dark brown.
Doesn't sound like it would be that great, but it is ridiculously tasty.
Alternatively, you can probably Google up some "oven roasted brussels sprouts" recipes. Similar end product.
The fishcakes recipe came from the same magazine as the Yummy Cake (Canadian Family, October 2010) and it's part of the article/group of recipes that are to help people make food that everyone will enjoy if you're also cooking for those with food sensitivities. This one was called "Shellfish-Free Crab Cakes".
I call them frickin delicious. You know I don't love the fish, but try to find recipes to make the fish palatable for me so I can reap the health benefits. THIS is sooo good!
Fishcakes
1/2 lb tilapia fillets (or another whitefish, if that's all you have available)
1/2 lb salmon fillets
2 medium sized white potatoes
1/2 cup finely chopped red onion
2/4 cup finely chopped parsley
Zest of 1 lemon
1 egg
2 tablespoons seafood seasoning (recipe calls for 1 tblsp Old Bay but we don't have that here)
Pepper (and salt if you're using Old Bay)
3/4 cup panko bread crumbs
Oil for pan frying
Peel and slice potatoes thinly, cover with cold water in a saucepot and boil until done. The thinner/smaller you slice potatoes (and other root veggies), the faster they will cook...obviously. And if you cut them evenly, they will cook evenly. Magic, that!
While potatoes cook, put a large frying pan of salted water onto the stove to boil. Once the water is boiling, turn it down to simmer and poach the fish for about 6 minutes.
Drain the potatoes well (don't want soggy fishcakes!) and scoop the fish onto a paper towel lined plate.
Now, let's get down to business: In a large bowl, rice potatoes (or mash), toss in onion, parsley, lemon zest, and seasonings. Peel skin off the fish (if necessary) and flake both into bowl (big chunks, small chunks, whatever you like). Mix gently and taste for seasoning. Adjust if necessary. NOW add the egg (see what I did there?) and mix gently to incorporate.
Place breadcrumbs on a shallow bowl (or plate). I added a little bit more of my seasoning because it was really good! Grab a golf ball sized chunk of fishcake, roll into a ball and flatten slightly to form a patty. Coat in panko and place on a plate or sheetpan. Continue until you've formed all the mix. You are probably looking at about 15 or 18 patties? Pop in fridge to cool down and set a little, about 30 minutes.
In the meantime, mix 1/4 cup mayo with just under 1/4 cup ketchup. Add 2 tablespoons chopped dill pickle (I actually took a shortcut and used dill relish)...or you could use sweet pickles, finely chopped red onion, nothing aside from the mayo and ketchup...up to you. Mix and stick in fridge.
Heat a thin layer of oil in the bottom of a frying pan and brown up the fishcakes. Drain on paper towel and enjoy!
I'm sure you could also bake them after spritzing them with a little oil if you don't like the idea of pan frying.
My thoughts about the recipe? It's an incredible main, and would be a great little appetizer. Don LOVED them, as did Quinn, and me, the fish disliker thought they were wicked good. Probably because of the crispy, crusty potato, and the seasoning. I could barely taste the fish inside, and I know it was there!
It did take longer than I like to spend on a weeknight dinner, so while I would definitely make this again, I would probably save it for a weekend.
My "skullheads" recipe is pretty simple, and may not sound appetizing, but I assure you, they are. I pick Brussels sprouts all about the same size (smaller is tastier, as is true for a lot of veggies) but as long as they aren't the size of my hand, they are fine. A little rinse, a cut in half, and a toss into a non-stick frying pan. If there are loose leaves that fall in, don't fuss, they are actually the best part of this dish. I admit that I often peel the leaves off on purpose just so I can have more of them.
Add about 1/4 cup water and a sprinkle of salt to the pan and let the veggies steam a bit. Turn down the heat to medium-high and add a tablespoon or so of butter. Allow to melt in, shake it up occasionally, and just let it sit and caramelize.
I usually add a couple of tablespoons of butter in 2 installments, but cook until the sprouts look brown and the loose leaves almost look burnt. Not quite black, and not stinking up the house with char, but dark brown.
Doesn't sound like it would be that great, but it is ridiculously tasty.
Alternatively, you can probably Google up some "oven roasted brussels sprouts" recipes. Similar end product.
The fishcakes recipe came from the same magazine as the Yummy Cake (Canadian Family, October 2010) and it's part of the article/group of recipes that are to help people make food that everyone will enjoy if you're also cooking for those with food sensitivities. This one was called "Shellfish-Free Crab Cakes".
I call them frickin delicious. You know I don't love the fish, but try to find recipes to make the fish palatable for me so I can reap the health benefits. THIS is sooo good!
Fishcakes
1/2 lb tilapia fillets (or another whitefish, if that's all you have available)
1/2 lb salmon fillets
2 medium sized white potatoes
1/2 cup finely chopped red onion
2/4 cup finely chopped parsley
Zest of 1 lemon
1 egg
2 tablespoons seafood seasoning (recipe calls for 1 tblsp Old Bay but we don't have that here)
Pepper (and salt if you're using Old Bay)
3/4 cup panko bread crumbs
Oil for pan frying
Peel and slice potatoes thinly, cover with cold water in a saucepot and boil until done. The thinner/smaller you slice potatoes (and other root veggies), the faster they will cook...obviously. And if you cut them evenly, they will cook evenly. Magic, that!
While potatoes cook, put a large frying pan of salted water onto the stove to boil. Once the water is boiling, turn it down to simmer and poach the fish for about 6 minutes.
Drain the potatoes well (don't want soggy fishcakes!) and scoop the fish onto a paper towel lined plate.
Now, let's get down to business: In a large bowl, rice potatoes (or mash), toss in onion, parsley, lemon zest, and seasonings. Peel skin off the fish (if necessary) and flake both into bowl (big chunks, small chunks, whatever you like). Mix gently and taste for seasoning. Adjust if necessary. NOW add the egg (see what I did there?) and mix gently to incorporate.
Place breadcrumbs on a shallow bowl (or plate). I added a little bit more of my seasoning because it was really good! Grab a golf ball sized chunk of fishcake, roll into a ball and flatten slightly to form a patty. Coat in panko and place on a plate or sheetpan. Continue until you've formed all the mix. You are probably looking at about 15 or 18 patties? Pop in fridge to cool down and set a little, about 30 minutes.
In the meantime, mix 1/4 cup mayo with just under 1/4 cup ketchup. Add 2 tablespoons chopped dill pickle (I actually took a shortcut and used dill relish)...or you could use sweet pickles, finely chopped red onion, nothing aside from the mayo and ketchup...up to you. Mix and stick in fridge.
Heat a thin layer of oil in the bottom of a frying pan and brown up the fishcakes. Drain on paper towel and enjoy!
I'm sure you could also bake them after spritzing them with a little oil if you don't like the idea of pan frying.
My thoughts about the recipe? It's an incredible main, and would be a great little appetizer. Don LOVED them, as did Quinn, and me, the fish disliker thought they were wicked good. Probably because of the crispy, crusty potato, and the seasoning. I could barely taste the fish inside, and I know it was there!
It did take longer than I like to spend on a weeknight dinner, so while I would definitely make this again, I would probably save it for a weekend.
Monday, August 30, 2010
Yummy Cake
Quinn eats Oatmeal Bear Paw cookies. They are these soft cake like cookies, and they are oh so convenient, but there are things in them that I prefer not to feed him - modified palm oils, sorbitol, artificial flavours...
I'm not saying that I'm going to totally stop buying them. They do serve their purpose as an occasional convenience food, but there has to be something better for him!
Then arrives my new Canadian Family magazine (October 2010). There was a recipe under the article "Smart Foods" for Flaxen Oaty Cranerry Walnut Bars.
Comparing the Nutritional Values, there really wasn't much difference between the Bear Paws and the Bars With the Really Long Name...but the ingredients were MUCH better. I made a couple of adjustments to the recipe and made them.
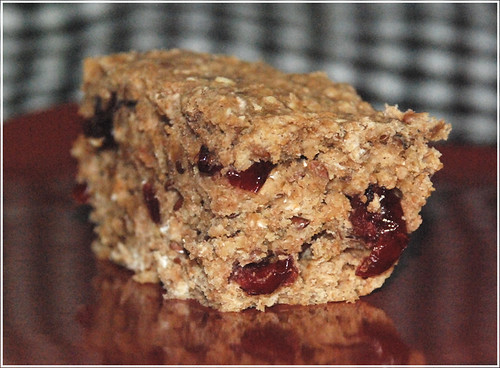
Quinn called them "Yummy Cake", which is a heck of a lot easier to remember than Flaxen Oaty Cranerry Walnut Bars. I will definitely make these again. I might try some different fruit and nut combinations next time. They are tasty, and healthy, and fulfilling. Give them a try!
Yummy Cake
2 cups whole wheat flour
1 cup oats
1 cup dried cranberries
1/2 cup chopped pecans
1/4 flax seeds
2 tsp cinnamon
1 tablespoon baking powder
1/4 teaspoon sea salt
3/4 cup demerara sugar
1/4 cup butter, softened
2 eggs
1 1/4 cup milk
2 teaspoons vanilla
Grease 9x9 square pan (these could probably make great cookie cakes or mini muffins...adjust the baking time as necessary if you change it up) and preheat oven to 350.
Mix flour, oats, cranberries, nuts, flax, cinnamon, baking powder, and salt in a bowl.
Cream butter and sugar in a seperate bowl, and add eggs, milk, and vanilla.
Add dry ingredients to wet ingredients and mix until just combined. Pour into pan and bake about 30 minutes (or until knife inserted in centre comes out clean).
Cool in pan and cut into bars.
Really, any fruit/nut combo would work. Bits of strawberry, raspberry, blueberry, apple...mash in a banana (maybe you'd need to adjust the milk and butter for that?) The cake part is a great base for anything you like to put into your baking. Grate in some zucchini! Heck, the possibilities are endless. Do it up!
I'm not saying that I'm going to totally stop buying them. They do serve their purpose as an occasional convenience food, but there has to be something better for him!
Then arrives my new Canadian Family magazine (October 2010). There was a recipe under the article "Smart Foods" for Flaxen Oaty Cranerry Walnut Bars.
Comparing the Nutritional Values, there really wasn't much difference between the Bear Paws and the Bars With the Really Long Name...but the ingredients were MUCH better. I made a couple of adjustments to the recipe and made them.
Quinn called them "Yummy Cake", which is a heck of a lot easier to remember than Flaxen Oaty Cranerry Walnut Bars. I will definitely make these again. I might try some different fruit and nut combinations next time. They are tasty, and healthy, and fulfilling. Give them a try!
Yummy Cake
2 cups whole wheat flour
1 cup oats
1 cup dried cranberries
1/2 cup chopped pecans
1/4 flax seeds
2 tsp cinnamon
1 tablespoon baking powder
1/4 teaspoon sea salt
3/4 cup demerara sugar
1/4 cup butter, softened
2 eggs
1 1/4 cup milk
2 teaspoons vanilla
Grease 9x9 square pan (these could probably make great cookie cakes or mini muffins...adjust the baking time as necessary if you change it up) and preheat oven to 350.
Mix flour, oats, cranberries, nuts, flax, cinnamon, baking powder, and salt in a bowl.
Cream butter and sugar in a seperate bowl, and add eggs, milk, and vanilla.
Add dry ingredients to wet ingredients and mix until just combined. Pour into pan and bake about 30 minutes (or until knife inserted in centre comes out clean).
Cool in pan and cut into bars.
Really, any fruit/nut combo would work. Bits of strawberry, raspberry, blueberry, apple...mash in a banana (maybe you'd need to adjust the milk and butter for that?) The cake part is a great base for anything you like to put into your baking. Grate in some zucchini! Heck, the possibilities are endless. Do it up!
Thursday, August 26, 2010
Radish Spread
So I went to a party at a friend's place a few weeks ago, and she had this INCREDIBLE radish dip...a recipe of her Mother's. I couldn't stay away from it! I got the recipe from her and immediately set to making it.
And it just didn't taste the same as hers. No matter what I did.
When people have a "signature recipe", I think it's just impossible to replicate it. Stacy must have put some magic in that dip. Seriously.
This recipe has haunted me since. Who would have thought that radish + cream cheese (and a few other things) = wicked good? What else could I do to this combination?
Making up recipes on the fly is easy. It really is. I know, you're probably rolling your eyes (I would have been, a few years ago), but if you know what tastes good with what, you can do it! I believe in you!
Let's see what we already know: nearly everything tastes awesome with cream cheese. It's true. Add a smear of cream cheese to a roast beef sandwich. It's GOOD! But cream cheese is sort of bland...so you have to build it up with flavours.
Garlic, shallots or onions, very finely diced would fit that bill. Garlic might be a little strong with the radish as I want the radish to shine. So shallots it was...I like the sweetness of a shallot. And I'm totally lazy, so rather than chopping it super finely, I just grated it into the cream cheese.
Let's look at the radish - what tastes good with radish? Dill does!
I added a bit of this and a bit of that, and came up with this recipe...and it's pretty awesome.
I love radishes but can only do so much with them raw, you know? I am glad to now have this spread in my repitoire...it would be all sorts of awesome spread atop a toasted sesame seed bagel, or (as I was eating it this afternoon)on a multi grain cracker.
Yummeh!
Radish Spread

1 brick cream cheese, softened
1 med shallot
1 teaspoon dill weed (or more...but keep in mind that the flavour intensifies over time)
splash lemon juice
7 medium sized radishes (or more)
pinch salt
Grate shallot and radishes into cream cheese and mix. Add dill and lemon juice, stir and taste. Add a pinch of salt, mix, and taste again. Adjust any flavours as you see fit (more radish, more dill...keeping in mind that the flavour will get stronger as the dip sits...whatever).
Put dip in fridge to set up a bit and allow the flavours to meld.
And it just didn't taste the same as hers. No matter what I did.
When people have a "signature recipe", I think it's just impossible to replicate it. Stacy must have put some magic in that dip. Seriously.
This recipe has haunted me since. Who would have thought that radish + cream cheese (and a few other things) = wicked good? What else could I do to this combination?
Making up recipes on the fly is easy. It really is. I know, you're probably rolling your eyes (I would have been, a few years ago), but if you know what tastes good with what, you can do it! I believe in you!
Let's see what we already know: nearly everything tastes awesome with cream cheese. It's true. Add a smear of cream cheese to a roast beef sandwich. It's GOOD! But cream cheese is sort of bland...so you have to build it up with flavours.
Garlic, shallots or onions, very finely diced would fit that bill. Garlic might be a little strong with the radish as I want the radish to shine. So shallots it was...I like the sweetness of a shallot. And I'm totally lazy, so rather than chopping it super finely, I just grated it into the cream cheese.
Let's look at the radish - what tastes good with radish? Dill does!
I added a bit of this and a bit of that, and came up with this recipe...and it's pretty awesome.
I love radishes but can only do so much with them raw, you know? I am glad to now have this spread in my repitoire...it would be all sorts of awesome spread atop a toasted sesame seed bagel, or (as I was eating it this afternoon)on a multi grain cracker.
Yummeh!
Radish Spread
1 brick cream cheese, softened
1 med shallot
1 teaspoon dill weed (or more...but keep in mind that the flavour intensifies over time)
splash lemon juice
7 medium sized radishes (or more)
pinch salt
Grate shallot and radishes into cream cheese and mix. Add dill and lemon juice, stir and taste. Add a pinch of salt, mix, and taste again. Adjust any flavours as you see fit (more radish, more dill...keeping in mind that the flavour will get stronger as the dip sits...whatever).
Put dip in fridge to set up a bit and allow the flavours to meld.
Subscribe to:
Posts (Atom)