If you're going to make these, keep in mind that you need to let them set for at least 3 hours but overnight is best. It makes 16 GIANT marshmallows. You can obviously make smaller ones (but they won't be as much fun).
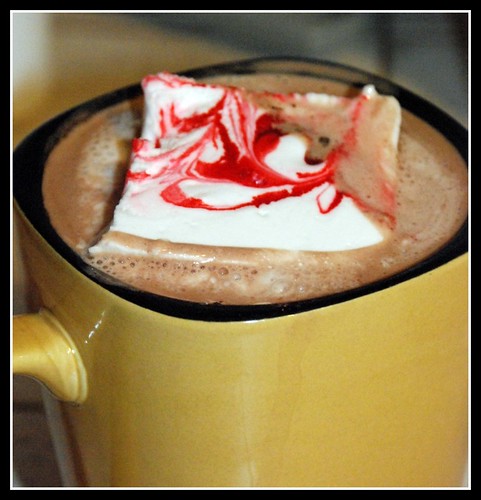
Every sip of your hot chocolate gives you a little slurp of gooey melty minty marshmallow.
Vegetable oil cooking spray
2 cups white sugar
1 tablespoon light corn syrup
4 packages unflavoured gelatin
3/4 teaspoon peppermint extract (though cinnamon would be really good too!)
2 large egg whites
Red food colouring (optional)
Coat an 8" square baking pan with cooking spray. Line bottom of pan with parchment paper and spray that too.
Put sugar, corn syrup and 3/4 cup water in a small saucepan. Cook over medium heat, stirring until sugar is dissolved. Raise heat to medium high, pop in a candy thermometer, and cook until it reaches 260 degrees. That's "firm ball stage" btw, if that's how you do things.
As the sugar cooks, sprinkle gelatin over 3/4 cup water in a heatproof bowl. Let stand about 5 minutes, to soften. Meanwhile, put a pot of water (the right size to pop the heatproof bowl into, to create a double boiler) on to boil. Place bowl onto simmering water and whisk until all the gelatin is dissolved. Remove from heat and add peppermint extract. Set aside.
Beat egg whites in the bowl of an electric mixer until stiff (but not dry) peaks are formed. With the mixer running, slowly add the gelatin into the egg whites. When sugar has reached 260 degrees, remove from heat and (with mixer still running) slowly (but steadily) add sugar to egg white and gelatin mixture.
Mix on high speed until very thick, about 12-15 minutes.
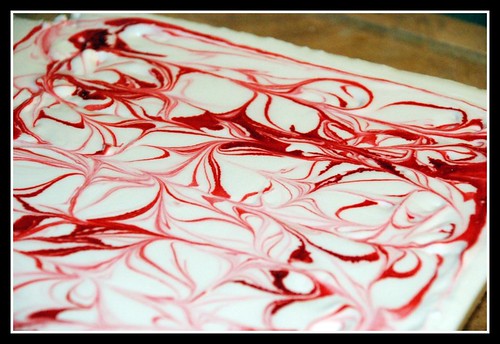
Pour mixture into prepared pan and very quickly drop a few drops of food colouring (if using) on the surface, and drag through with a toothpick, skewer or knife to create a swirly design.
Let stand, uncovered, at room temperature for at least 3 hours but preferrably overnight, to set up.
Cutting these fluffy squares of deliciousness was a real pain in the rear. My solution was the same as cutting the cheese...uh, I mean cutting soft cheese.
Dental floss. (How's that for irony?)
Run a knife along the sides of the pan to loosen the edges, then get the tip of the knife under the parchment paper and slip the whole thing out onto the counter. Take a length of dental floss and slide it between the parchment and the bottom of the marshmallow. It should go very easily. Position both sides to the approximate center and lift both ends to meet in the middle. The floss will slice cleanly through the marshmallow. It might not look like it, but it did.
Repeat, repositioning and slicing until you have the desired number of marshmallows.
Martha, of course, has these goodies all perfecly packaged in cellophane bags. I tried to put one of mine in a cellophane bag and it looked like a bit of a marshmallow crime scene.
My solution was to cut a length of parchment paper (because they are still fairly sticky), lay out four marshmallow squares side by side, fold the long sides up and over, and fold the short ends into a triangle, rolling to secure.
1 comment:
Cutting the cheese - heh.
Post a Comment